Home » Deck Repair Services
Category Archives: Deck Repair Services
Framing and Deck Building
Building a deck adds outdoor living space and increases home value. It’s also a major undertaking.
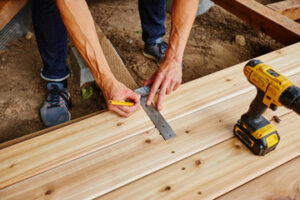
Dig the footings, install posts and attach beams to form the foundation of the deck. Install joists and rim joists as per the manufacturer’s instructions, using metal joist hangers. Contact Deck Builders Lexington KY for professional help.
Use care to make sure the deck-to-wall connection is sealed tightly. Gaps allow water, snow and carpenter ants to invade the structure and cause damage.
Posts and beams are the foundation of any deck, transferring the weight of the structure to concrete footings that are sunk into the ground. The larger the deck, the more weight it must be able to support, and therefore the bigger the posts and beams must be. Posts are typically made from pressure-treated lumber.
Beams are built up from multiple pieces of 2 x 6 lumber to create a stronger and more durable structure. You can use pre-fabricated beams if you are working with an existing deck and have a limited budget, but if you’re building from scratch it is more cost-effective to use rough sawn pressure treated lumber for the framing.
Choosing the right size of beams and posts is an important part of the overall design of your deck, and requires some careful load calculations. The International Residential Code (IRC) provides basic guidelines for these calculations, but your local building authority may have its own version of the code. Ask your local building department for a copy of the code, or look online for a cheat sheet to help you identify the key variables.
To prevent the footings from sinking too far into the ground, they should be set a minimum of 6 feet apart. The footings also need to be set below the frost line, which varies by region. A footer calculator is available on our website to help you determine the number of concrete footers you will need.
Once you’ve determined the size of the footings and posts, it is time to install them. First, you must dig holes and pour the footings to a depth at least as deep as the height of the deck posts. This will ensure that the structure is not too close to the house and will be able to withstand any future expansion and contraction of the soil around it.
Then you must mount the deck posts. For a single-level deck, you can use 4×4 posts, but for higher multi-level structures, you must use 6×6 posts. If you are using 6×6 posts, make sure you have enough in stock to cover your entire deck. When installing the posts, use through bolts that pass through both the post and the beam, rather than lag bolts, which can loosen over time and leave the posts and beams vulnerable to damage.
Joists
Deck joists are the framework for your deck, and they have an impact on more than just how the deck looks. They also affect how long the deck will last and how well it will hold up to the elements and use. Choosing the right materials and properly installing the joists are key to building a sturdy, durable deck. The joists must be strong enough to support your deck’s live and static loads, so make sure you choose lumber with adequate strength ratings. You should also check your local building codes to ensure you are using the correct joist size for your deck’s dimensions.
The most common joist sizes are 2 x 6s through 2 x 10s. You can also purchase pre-cut joists to save time. Joists should be pressure treated for protection from the elements.
Use a level and chalk line to mark straight lines for joist placement. Joists should be spaced no more than 8 feet apart to prevent bending and twisting under load. If you encounter any obstacles that are in the way of a joist, frame around them to keep the joists evenly spaced. For example, if a wall or fence posts are in the path of one of your deck joists, install ledger pieces on either side of the obstacle and install joists on both sides of the obstruction. If the joists are to be joined together with a header, cut and install a piece of blocking between the joists.
For longer joists, you may need to install solid blocking to prevent the joists from twisting under heavy loads. This is especially important if you are using 2x10s or taller joists. Blocking is typically just short boards that are cut to the same length as your joists. The blocking should be placed between the joists and attached with nails or screws.
If you are using 2x10s for joists, consider skipping the center beam and going to 20 ft joists instead of 16 ft. This will allow you to get the bearing you need without a center beam. 2x12s can span 16′-6″ at 16 oc and have a maximum cantilever of 4′.
Ledger Board
The ledger board connects the deck to the house and transfers much of the deck’s load to the foundation. It is crucial that it be a good fit and well fastened to the house. If it isn’t, the deck can eventually rot and fail. The ledger should be secured to the rim joist or band joist of the house.
Many newer houses use engineered lumber instead of standard 2x lumber as rim joists and band joists. When using this type of lumber it is necessary to follow the manufacturer’s instructions for attaching a ledger board to it. These will usually require a special spacer to be used between the sheathing and the rim joist in order to avoid over tightening the ledger board which can pull the house sheathing and framing together and cause leaks.
Another option for securing a ledger is to use metal flashing. This creates a dry air space between the house sheathing and the ledger which will extend the life of both. This is especially important in wet climates where moisture can quickly cause wood rot.
Rigid flashing can be screwed to the sheathing or lag bolted to it. This method is less expensive than a special spacer but still provides a strong and durable connection. It is often recommended by the manufacturers of the flashing and is required in some areas.
Depending on where you live, your local codes may require specific minimum and maximum lag bolt spacing configurations for the ledger board. This is a very important factor to consider when installing a deck as it can be extremely dangerous for a homeowner to attempt to install a deck that does not meet code requirements and is unsafe for a family to use.
If the deck is to be built over an existing foundation it can be a very challenging task to securely attach the ledger to the concrete. If this is a project you intend to undertake it is best to build the deck while the house is being constructed so that the ledger connections are installed at a very early stage of construction. This will make it easier to ensure the proper connection is made.
Framing
A deck can add outdoor living space to your home and increase its value. Building a deck requires an understanding of construction methods, including framing. You will need to plan the layout of your deck, lay a foundation, construct the frame and then install surface decking. You will also need to consider stairways and railings, depending on how high your deck is off the ground. The decking itself may be made of wood or a synthetic material.
The footings and posts that form the base of your deck will be set below the frost line — the depth at which water in the soil typically freezes — to protect the posts from heaving up during freezing weather. A concrete footer is a common choice, but you can also use piers. Both types require a mix of concrete and gravel to set the posts.
Before you start constructing the deck’s frame, consult your blueprints and local building inspection office to determine load requirements for the structure. This information will help you decide the size of beams and joists, and the dimensions for the decking itself. For example, a small deck might require 2 x 6 lumber, while a larger deck might need 2 x 10 or even 2 x 12 lumber.
After the posts and footings are set, you will build the deck’s frame with joists. Depending on the design of your deck, you might need to install a ledger board that attaches the deck to your house. The ledger will provide the support for the deck’s surface, so it is important to attach it correctly. The level at which the top of the ledger rests should be the same as the level where you will mount the joists.
When you start building the joists, it’s best to work with a partner. This will make the job go faster and ensure that the joists are built evenly. It’s also important to work with lumber that has been treated for exterior use. Otherwise, it will rot more quickly.
When you’ve finished framing the joists, you can start laying decking boards. Usually, these are 1 x 4 or 1 x 6 pieces of lumber, but you can also choose synthetic decking materials. You will need to install stairways and railings as well, depending on how high the deck is off the ground and code requirements.